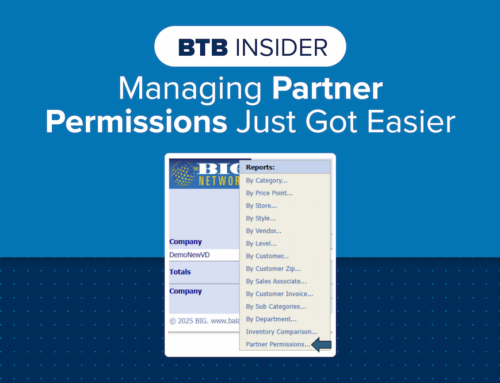
Creating Balance to Buy reports and saving them is a useful tool that will help save you time and take the task of remembering to pull reports off your plate. It also allows you to schedule the report to be automatically emailed to yourself as well as internal and external contacts based on a set schedule you create.
Most Balance to Buy reports can be saved. Once you have created a report that you would like to save, follow these steps. For this example, we will set up a report that will show our monthly Diamond Stud styles sold from IDD to be auto generated on the 2nd of each month for the previous month.
1. Once you have applied all the correct filters, name the report in the Report Name box located under “Apply Filter” box.
2. Click Save.

3. A pop-up window will appear near the top of screen letting you know that the report has been saved successfully. Click OK.

4. To access your Saved Reports, click on the Saved Reports tab located on the headers near the top of your screen.
5. On the Saved Reports screen, you will see all reports that have been saved. From this screen, there are multiple options.
- Excel, PDF, or CSV will export the report in the format selected. This will export the report as it was saved, unless you have scheduled it differently. For this example, if we were to export to Excel without scheduling it, it would show sales for 12 months instead of for one month.

- Schedule will allow you to auto-generate the report with the frequency, time-period, and distribution list you set. When you click on Schedule, you will be taken to the Schedule screen. This is where you will set the parameters for the report.
- Enabled – Ensure you check Enabled if you want the report to automatically generate.
- Frequency – Select the frequency you would like the report distributed. The options are Days in the Week, Days in the Month, Daily, Weekly or Bi-Weekly. For this example, we will select Days in the Month. You can pick whichever day in the month, here we will choose the 2nd.
- Time of Day to Run – select the time of day you want the report to run. We suggest picking 7am CST or later to ensure that your data has been loaded and updated.
- Report Format – select the format you would like to receive the report as. The options are Excel, PDF, or CSV.
- Time Period – this sets the sales start and end dates. In this example, we are looking for sales of the prior month so we would select Last Month. The other options available are Last Day, Last Week, Week to Date, Last 2 Weeks, Last 2 Months, Month to Date, Rolling Month, Last Month, Last Quarter, Year to Date, Last Year, Last 2 Years, Last 3 Years.
- Starting Prior – this is an advanced option that typically isn’t used. It allows you to offset the sales start and end dates. If you are interested in using it, please contact your BTB consultant.
- Email Addresses – this is where you will enter the email addresses for the report to be sent to. You can enter as many emails as needed, separated by commas. As mentioned above, the emails can go to external recipients (outside your organization). If you don’t want the report automatically emailed, you do not need to assign email addresses. This will allow you to Export the report manually from the Saved Report screen, with the time-period you selected.

Once you have selected the correct options for the Schedule, hit Update. Note, that if you hit Run Now the report will be emailed to the recipients immediately.
- View will take you back to the Balance to Buy working environment with the filters that were originally selected.
- Delete will delete the report.
- Rename allows you to rename the report.
Click the image below for a helpful video tutorial:

Contact your Balance to Buy Consultant for help, we are just a call or click away!
DO YOU HAVE A BTB INSIDER TIP?
Submit your BTB Insider tip to info@bigjewelers.com and you may see it in our next Balance to Buy Insider email!